
반응형
앞으로 플러터 공부하면서 블로그에 기록해보려 한다.
코딩셰프 순한맛 강좌 14, 15, 16강
import 'package:flutter/material.dart';

void main() => runApp(MyApp());

class MyApp extends StatelessWidget {
  const MyApp({Key? key}) : super(key: key);

  @override
  Widget build(BuildContext context) {
    return MaterialApp(
      debugShowCheckedModeBanner: false,
      title: 'Appbar',
      theme: ThemeData(
        primarySwatch: Colors.red
      ),
      home: MyPage(),
    );
  }
}
class MyPage extends StatelessWidget {
  const MyPage({Key? key}) : super(key: key);

  @override
  Widget build(BuildContext context) {
    return Scaffold(
      appBar: AppBar(
        title: Text('Appbar icon menu'),
        centerTitle: true,
        elevation: 0.0,
        actions: [
          IconButton(
            icon: Icon(Icons.shopping_cart),
            onPressed: () {
              print('shopping cart button is clicked');
            },
          ),
          IconButton(
            icon: Icon(Icons.search),
            onPressed: () {
              print('search button is clicked');
            },
          ),
        ],
      ),
      drawer: Drawer(
        child: ListView(
          padding: EdgeInsets.zero,
          children: [
            UserAccountsDrawerHeader(
              decoration: BoxDecoration(
                color: Colors.red[200],
                borderRadius: BorderRadius.only(
                  bottomLeft: Radius.circular(40.0),
                  bottomRight: Radius.circular(40.0),
                ),
              ),
              accountName: Text('JJangGu',style: TextStyle(fontWeight: FontWeight.bold),),
              accountEmail: Text('Jjanggu@naver.com'),
              onDetailsPressed: (){
                print('arrow is clicked');
              },
              currentAccountPicture: CircleAvatar(
                backgroundImage: AssetImage('assets/JjangGu.png'),
              ),
              otherAccountsPictures: [
                CircleAvatar(
                  backgroundImage: AssetImage('assets/SoCute.jpg'),
                )
              ],
            ),
            ListTile(
              leading: Icon(Icons.home,color: Colors.grey[850],),
              title: Text('Home'),
              onTap: (){
                print('Home is clicked');
              },
              trailing: Icon(Icons.add),
            ),
            ListTile(
              leading: Icon(Icons.settings,color: Colors.grey[850],),
              title: Text('Setting'),
              onTap: (){
                print('Setting is clicked');
              },
              trailing: Icon(Icons.add),
            ),
            ListTile(
              leading: Icon(Icons.question_answer,color: Colors.grey[850],),
              title: Text('QnA'),
              onTap: (){
                print('QnA is clicked');
              },
              trailing: Icon(Icons.add),
            ),
          ],
        ),
      ),

    );
  }
}
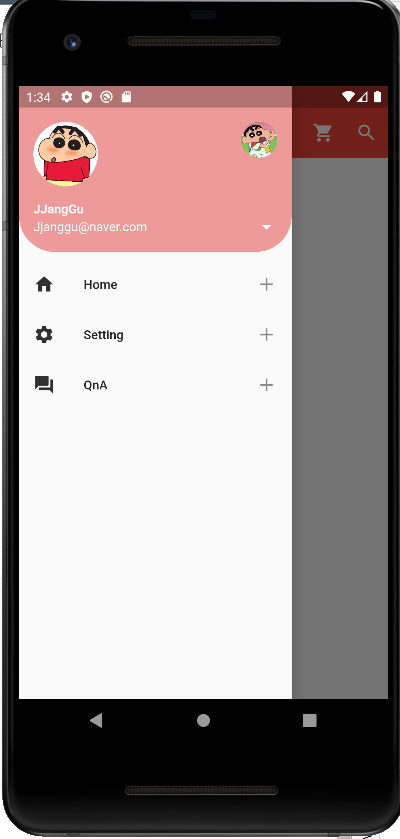
앱바 메뉴 아이콘
actions : []
- 복수의 아이콘 오른쪽 배치
leading
- 아이콘 버튼이나 간단한 위젯 왼쪽 배치
drawer
Drawer을 실행하면 저절로 왼쪽 햄버거바 생성
leading을 하지 않아도 됨
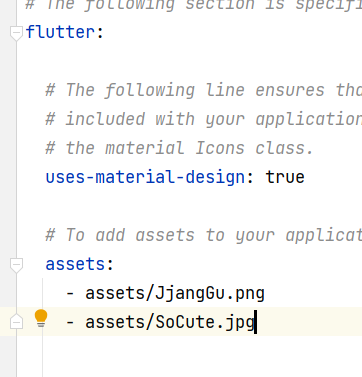
*주의할 것
local 이미지를 넣을 때 assets 파일 생성을 자신의 본 파일 내부에 해야함
빈칸에 new -> Directory 하면 assets 파일이 android 파일 내에 생성됨
그리고 pubspec.yaml 파일에 aseets 부분 추가하기
UserAccountsDrawerHeader의 box derocation 코드 부분
darwer 헤더 박스의 오른쪽 아래, 왼쪽 아래 부분을 둥글게 만듦
만약 모두 둥글게 만들고 싶다면 BorderRadius.all() 을 하면 됨
decoration: BoxDecoration(
                color: Colors.red[200],
                borderRadius: BorderRadius.only(
                  bottomLeft: Radius.circular(40.0),
                  bottomRight: Radius.circular(40.0),
                ),
              ),
ListTile 코드
leading과 title로 이루어짐
trailing은 위 사진의 타일 오른쪽 부분 더하기 버튼 추가한 곳
ListTile(
              leading: Icon(Icons.home,color: Colors.grey[850],),
              title: Text('Home'),
              onTap: (){
                print('Home is clicked');
              },
              trailing: Icon(Icons.add),
            ),
반응형
'🎞️프로젝트 > flutter' 카테고리의 다른 글
| [flutter] 로그인과 주사위 게임 만들기 (코딩셰프 조금 매운 맛) (0) | 2022.03.10 |
|---|