
안녕하세요.
오늘은 docker로 mysql 을 띄우고 spring을 연동해보려고 합니다.

서버는 ncp의 micro 서버, docker는 최신 버전, mysql 은 8.0.28 버전, 자바는 1.8을 이용했습니다.
1. docker 설치하기
yum update를 하게 되면 시간이 엄청 오래 걸립니다. 차분히 기다려줍니다.
yum update
yum install -y yum-utils
도커 엔진을 설치하는 저장소를 추가합니다.
yum-config-manager --add-repo https://download.docker.com/linux/centos/docker-ce.repo
최신 버전의 도커 ce를 설치합니다.
yum install docker-ce docker-ce-cli containerd.io -y
도커의 버전을 확인하고, 도커 서비스를 시작해줍니다.
enable docker는 재부팅 후에도 서비스를 자동 시작하게 됩니다.
docker -v
systemctl start docker
systemctl enable docker
systemctl status docker
systemctl status docker 는 현재 도커가 실행 중인지 확인할 수 있습니다.

2. docker로 mysql 띄우기
docker pull 명령어를 사용하여 mysql 버전 8.0.28 을 가져옵니다.
docker pull mysql:8.0.28
docker images 명령어로 도커에 mysql 이미지가 잘 받아진 것을 확인할 수 있습니다.

아래의 명령어로 mysql-container를 run 할 수 있습니다.
--name은 컨테이너의 이름을 지정하고 -d는 백그라운드 실행 -p 는 포트포워딩입니다.
docker run --name mysql-container -e MYSQL_ROOT_PASSWORD=password -d -p 3306:3306 mysql:8.0.28
docker ps 명령어로 현재 실행 중인 컨테이너를 확인할 수 있습니다.
-a는 종료된 컨테이너도 출력하는 옵션입니다.

3. docker mysql 컨테이너 들어가서 한글 세팅하기
mysql 컨테이너의 /bin/bash로 들어갑니다.
docker exec -it mysql-container /bin/bash
이 상태에서 database 를 생성하고 테이블을 생성하여 한글 데이터를 넣게 되면 ??? 이런식으로 저장됩니다.
따라서 몇가지 설정을 더 해주어야합니다.
도커 컨테이너에는 vim 이 안깔려있어서 yum으로 다운 받습니다.
apt-get update
apt-get install vim
그리고 /etc/mysql/my.cnf 를 수정해줘야합니다.
vim /etc/mysql/my.cnf
파일에는 아래의 내용을 추가합니다.
[client]
default-character-set=utf8

[mysql]
default-character-set=utf8

[mysqld]
collation-server = utf8_unicode_ci
init-connect='SET NAMES utf8'
character-set-server = utf8
mysql 에 접속하여 docker run 할 때 지정해 둔 비번을 입력한 뒤, 데이터베이스를 생성해줍니다.
mysql -u root -p
CREATE DATABASE <database_name> DEFAULT CHARACTER SET utf8 COLLATE utf8_general_ci;
4. spring 띄우기
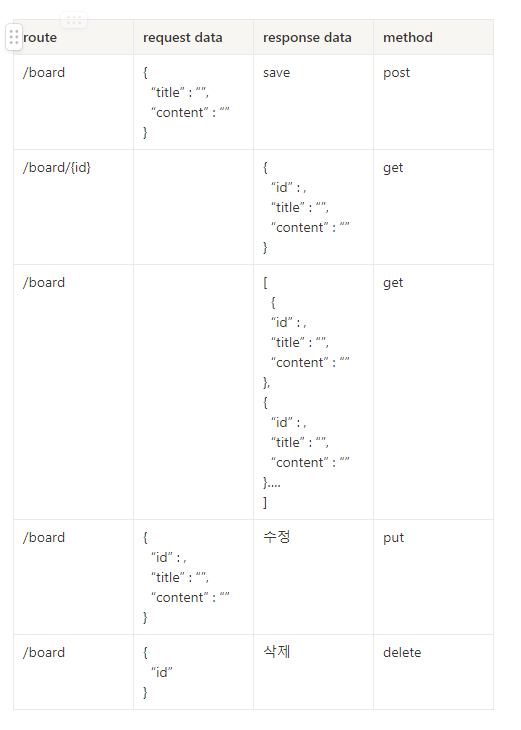
이 프로젝트는 대략 아래의 이미지의 rest api를 구현했습니다.
의존성은 이렇게 추가해주었습니다.
dependencies {
    implementation 'org.springframework.boot:spring-boot-starter-data-jpa'
    implementation 'org.springframework.boot:spring-boot-starter-web'
    compileOnly 'org.projectlombok:lombok'
    annotationProcessor 'org.projectlombok:lombok'
    testImplementation 'org.springframework.boot:spring-boot-starter-test'
    implementation 'mysql:mysql-connector-java:8.0.28'
}
application.yml 파일입니다.
spring:
  datasource:
    username: root
    password: password
    driver-class-name: com.mysql.cj.jdbc.Driver
    url: jdbc:mysql://localhost:3306/testpj?serverTimezone=UTC
  jpa:
    hibernate.ddl-auto: update
bootJar로 build를 한 뒤 scp 명령어로 아래의 파일을 서버로 가져왔습니다.
scp C:\Users\User\IdeaProjects\testPj\build\libs\testPj-0.0.1-SNAPSHOT.jar root@ip:~
그리고 다시 서버로 접속하여 jar 파일을 실행합니다.
nohup java -jar 파일명.jar &
5. 확인하기
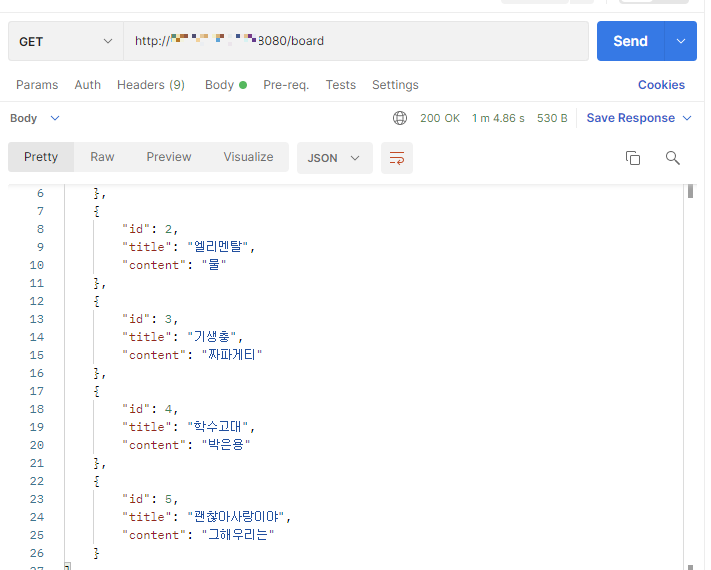
postman을 사용하여 데이터를 요청해보았습니다.

잘 들어간 것을 확인할 수 있습니다.
6. 레퍼런스
https://poiemaweb.com/docker-mysql
Docker를 사용하여 MySQL 설치하고 접속하기 | PoiemaWeb
poiemaweb.com
컨테이너 MySQL 한글 인코딩 해결 방법
컨테이너로 기동한 mysql의 database와 table의 한글 깨지는 현상을 해결하기 위한 utf-8 인코딩 방법
velog.io
'🌎infra > docker' 카테고리의 다른 글
| [Docker] docker nginx에 html 매핑하기 (3) | 2023.09.18 |
|---|---|
| [Docker] docker로 nginx와 spring boot 배포하기 (0) | 2023.09.11 |